
#1 - DIY usability testing
You'll need to setup a somewhat quiet place where your testers can . . . test. Your testers should be actual users of the system or at least as close as you can get.
Things you'll need for desktop / laptop testing:
- laptop
- second monitor (so you can follow along in a non-creepy way)
- mouse (some will opt to use the trackpad)
- your list of tasks and a separate list of the same tasks with participant questions
- a way to score the results (I use Google Sheets to keep track of results as seen below.)
- hand sanitizer
- screen recorder (I use Screencast-O-Matic - the pro version is only $15 / year)
- Steve Krug's list of everything
Additional things you'll need for mobile testing:
- smartphone (preferably theirs - but have a backup just in case)
- webcam
- something to hold the webcam so it faces downward to record their phone
#2 - Utilize usertesting.com

If you have the budget to use usertesting.com or a similar product this can be beneficial in that you'll get your results faster than the DIY approach.
Again, you'll need a budget for this and if you don't #1 is for you.
You'll still need your tasks mentioned in #1 and a way to score results.
#3 - View your results
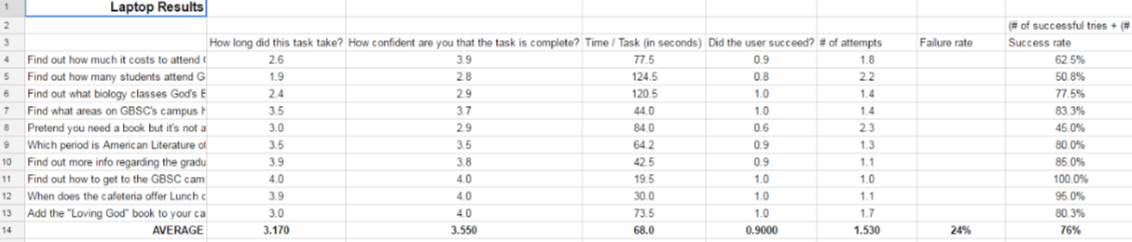
Have the participant answer two questions just after each task:
- How long did this task take?
- How confident are you that the task is complete?
Here's the scale that I use.
For their speed perception:
- very quick (4 - not seen by the user)
- somewhat quick (3 - not seen by the user)
- somewhat slow (1 - not seen by the user)
- very slow (0 - not seen by the user)
For their confidence level:
- very confident (4 - not seen by the user)
- somewhat confident (3 - not seen by the user)
- not that confident (1 - not seen by the user)
- not confident at all (0 - not seen by the user)
If you screen captured the test (you should have) go back to see how long it took the person to complete each task. Did the user succeed (1 for yes, 2 for no). How many attempts did they make on each task - ideally only one attempt.
Lastly find the success rate (as a %). This is the formula I've used found at one point on the Nielsen Norman Group website (sorry - I couldn't find it again):
(# of successful tries + (# of partial successful tries * .5)) / # of total attempts
Before you (re)design, (re)write or (re)code anything you should get a baseline for how the website performs currently. Then, as you go along, you can keep comparing to that original baseline to see if you're progressing in usefulness or not.
Conclusion
Without usability testing, you won't know how your site is performing on a quantitative or qualitative scale. You should also test the existing system first to get your baseline in order to compare any changes you make in the future.
For more tips on how to build a better UX be sure to check out the other articles in this series:
- Part 1 - Research
- Part 2 - Usability Testing
- Part 3 - Information Architecture
- Part 4 - Content Strategy
- Part 5 - BONUS - WordPress